How To Add “save this post” Email Signup Form
This guide will go over the steps to add a “save this post” email signup form to your blog posts. Being highly visible to the user as an in-content embedded form, the conversion rate on these is very good. In addition to visibility, this setup offers users a simple method of bookmarking a post for later review as they will be emailed a link to the post in their inbox.
Note this setup is of moderate difficulty, requiring the installation of several plugins and setup of 3rd party services to work properly. Some steps may be skipped presuming you’re familiar with setup of these services.
TLDR; we’ll use a contact form plugin to connect to your newsletter provider, the form will be added to posts and when a user enters their email they will simultaneously receive an email containing the link to the post and also be signed up to your newsletter subscriber list.
Choosing A Contact Form Plugin
We’re going to need a premium version of one of the plugins listed below. The premium version is necessary to gain access to advanced features and also unlock their integrations/addons for your newsletter provider. Here’s a handy table to cross-reference different popular contact form plugins, their prices, available newsletter integrations, and maybe most importantly links to previous security vulnerabilities so you can get an idea of risks involved with using these plugins.
| Forms Plugin | Price | Email Integrations | Security Concerns? |
| WPForms | ~$100 | ConstantContact, ConvertKit, Mailchimp, ActiveCampaign, SendInBlue, Mailerlite, Aweber | Medium Risk (Free / Pro) |
| Fluent Forms | ~$50 | ConvertKit, Mailchimp, SendInBlue, Mailerlite, Moosend, Constant Contact, ActiveCampaign | Medium Risk (details) |
| Ninja Forms | ~$100 | ActiveCampaign, AWeber, Constant Contact, ConvertKit, EmailOctopus, Mailchimp | Extreme Risk (details) |
| Formidable Forms | +$100 | Mailchimp, Constant Contact, Aweber, ActiveCampaign, Convertkit, Mailerlite, | High Risk (details) |
Setup Contact Form Plugin
This part varies between each plugin slightly. The gist of it is, you’ll install the premium version of your chosen plugin, configure the settings to best suit your site/needs, and make sure your license code is entered so you can continue getting updates and security patches as needed. You’ll need to install the accompanying integration/addon for your newsletter provider as well. I’ll go over the basic steps now using Fluent Forms and their ConvertKit addon.
Example Setup Fluent Forms + ConvertKit
Once both Fluent Forms Pro and the ConvertKit integration has been installed/enabled, the next step is to connect your CK account. You’ll need to navigate through the plugin settings at Fluent Forms Pro > Global Settings > Configure Integrations > Convertkit (yoursite.com/wp-admin/admin.php?page=fluent_forms_settings#general-convertkit-settings). From here, add your API Key and API Secret from your ConvertKit account settings (from your CK dashboard go to Settings > Advanced > API). Once your ConvertKit account is in sync with Fluent Forms, we can now create a form that will automagically subscribe users to your account.
Create A New Form
I’ve started with a blank Fluent Form. I added a “Custom HTML” field to add a little message about the signup form. It should probably include a little detail about how the user will be getting subscribed to your newsletter too. Then I added an email field. The settings on each allow you to customize some things, like I hid the email field’s label. Each forms plugin has different options, I like the Fluent Forms builder because it has so many options, for example it would be very easy to add a columns block if you want your email field and submit button side-by-side all nice and compact. That’s getting a bit out of scope for this article, so for now I’ll just leave it simple:

Connect The Integration Addon
Next you’ll go to the Settings & Integration section and add ConvertKit to your form:

Now configure your settings – pick a CK form your FluentForm will be connected to if you want (could be used for building funnels/automations, etc), “map” your CK fields with your FF fields (eg, use the dropdown selector in the FF side and match the fields to the fields you see on the left CK side = email and email, first name and first name, etc), for this example I only added an Email field in my FF form so I’ll only map that field to match CK’s email field. You can tag subscribers with the dropdown selector here too, and make sure to turn on the integration with the last setting at the bottom for “status” that should read “enable this feed”. Boom – this Fluent Forms form is now connected to ConvertKit.
Setup Email Notification (the “saved post” email)
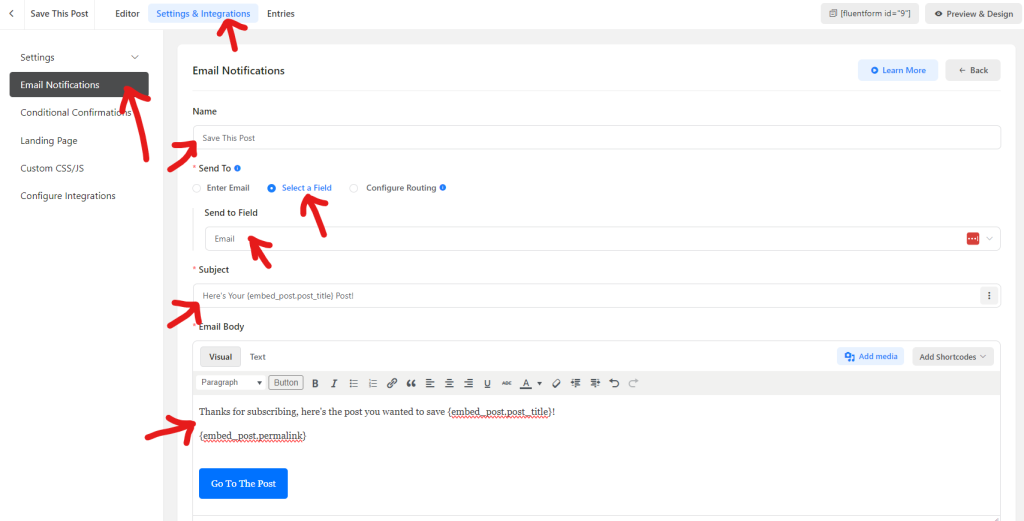
Next we need to setup the actual email the new subscriber will be getting from your site with the link in it. Go to the Email Notifications section and click “add new notification”:

When a user uses the form on the frontend, we want them to receive an email, this is how it’s done – with a notification! Fluent Forms has a dropdown in their editor that lists all the shortcodes, in this example I used the {embed_post.post_title} to paste the title of the post they subscribed on into the email’s subject line and inside the email contents. I also used {embed_post.permalink} to make a link to the post, you can link a button too as seen in my example screenshot. Note the red arrows, the send-to field should be “select a field” and then select Email (so the notification gets sent to the new subscriber). Save that notification, it’s all set!
Recapping The Setup
At this point we have a workable form that you can insert right into your posts as needed, our example would look something like this:

Not too shabby! Fluent Forms really makes the process pretty simple, if your newsletter provider has an integration with them available they’d be a great choice for forms plugin. The other forms plugins should have pretty similar options – only varying slightly, the basic steps are:
- Install the plugin and addon/integration.
- Connect the integration addon to your newsletter provider (usually always with API keys).
- Setup a form that’s connected to your integration addon so the user gets subscribed.
- Edit that form so it sends a notification whenever it gets used to whatever email address is added to the email field, then in the contents of that notification email place your “welcome” message with shortcodes for the link to the post.
Check the documentation pages for the forms plugin you use to see what shortcodes they have available:
Auto Insert Your Form Into Posts
In the previous step we got to the point where you can now add a Fluent Forms block to your post content and select your new “save this post” form, hazzah! But maybe you don’t weant to edit all your old posts to insert the form, let’s dive into an option for auto-inserting it.
Depending on your theme this may be something as trivial as tweaking a setting or adding a new Element (Kadence theme!). Since theme’s vary so much, I’ll offer a solid plugin option. Enter Insert Headers & Footers plugin by WPCode. It’s a really great plugin for easily adding scripts to the header/footer, but also has a powerful code inserter as well.
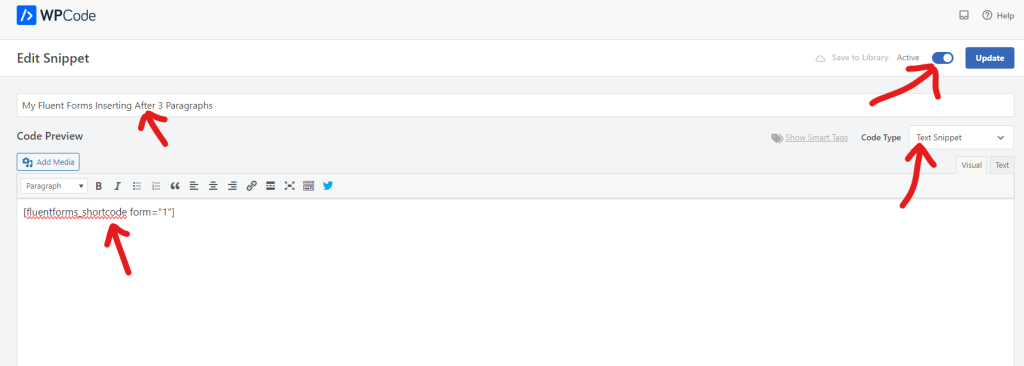
Once installed + activated, go in wp-admin to Code Snippets > + Add Snippet. Select “add your custom code” for a blank snippet we can add code to. Next, select “Text Snippet” for the Code Type so we can insert our Fluent Forms shortcode. Then add your Fluent Forms shortcode for the form we created before (or whichever form plugin/shortcode you’re using). You can name the snippet something too, just to make it easy to find some day if you ever need to turn it off or delete it, here’s how my snippet looks so far:

Now scroll down to “insertion” section, here’s you’ll tell WPCode where you want your snippet (your form) to get inserted. Here you can see I selected “insert after paragraph” which inserts into the post content, there’s an option now to pick how many paragraphs it should count before inserting the code, 2-3 paragraphs should be good!

That’s it! Save your snippet and go check a post, your form should be showing up there now.
Send Bulk Email From Your Website Properly (SMTP)
I can’t overstate how important this step is, you need quality email send capability for your website if you’ll be sending email from your website. Most hosting companies (smart ones anyways!) will either be totally blocking your website from being able to send email (to prevent abuse), or severely restrict your websites ability to send email (to prevent abuse). Beyond those limitations, there’s a huge quality issue as well = hosting-sent-email uses phpmail, which is generally universally marked as spam, because it’s not validated in any way. So you do all the work setting up this email system, and now nobody is getting emails, or few people are getting the emails but it’s buried in their spam box.
The solution is SMTP. The maker of Fluent Forms has an awesome SMTP plugin FluentSMTP. Without getting into a long explanation about it, the SMTP plugin will allow you to offload your website’s email sending needs to a 3rd party service like Sendgrid (100 emails/day on the free plan). Once your Sendgrid (or other SMTP provider) account is setup and your domain is validated with them, then you can connect it to your SMTP plugin, now all emails your website sends will be sent by the SMTP service – and all those emails will have full validation so they will go into subscribers’ inboxes.
Customizing The Form
I will come back to this some day 😀
Getting This To Work With Newsletter Providers That Have No Integration
Check the forms plugins integrations again, if you find a integration for Pabbly or Zapier you can Google it to see if Pabbly/Zapier have an integration available for your Newsletter provider. The caveat to this is you may need to pay for those services if you go over their free-tier limits (currently ~100/mo).
